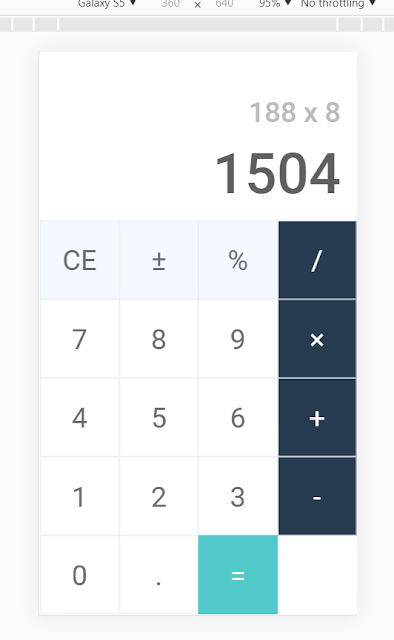
In this tutorial, I will build a beautiful ionic4 calculator template using css grid layout.
Article Objective
This tutorial shows developers how easy it became with the new CSS Grid.Prerequisites
You need to have some experience with Ionic Framework and CSS before taking this tutorial as I won’t be explaining the basics of CSS. I will only concentrate on the parts that are relevant to Grid layout.It is also recommended that you use either chrome or Firefox browser for this tutorial as they both have a great inspector that help developers during development.
Getting Started
I will start by creating a blank ionic 4 project by running the command below:ionic start ionic4-calculator blank
Open the project up in visual studio code, then clean up the home page in src/app/home/home.page.html.
The Layout Markup
The calculator has two parts - the display screen and the keypad. Let's start by creating a basic structure. Add two divs within the ion-content of the home.page.html file like so:188 x 8
1504
Switch to src/app/home/home.page.scss file and add the style like so:
.screen-section{
    height: 30%;
    background: #fff;
    padding:10% 5%;

    h1{
        font-size: 4rem;
        color:rgb(94, 96, 97);
    }
    h3{
        color:#B9BBBD;
        font-size: 2rem;
    }

    h3,h1{
        text-align: right;
        line-height: 100%;
    }


}

.button-section{
    height: 70%;
}
The Keypad markup
As you can see, we just have a bunch of buttons with special classes.
Button Styles
Add the following style to the home.page.scss file to make the buttons look better.
 button {
      background-color: #fff;
      border-width: thin;
      border: solid 0.5px  #ECEDF4;
      background-color: transparent;
      font-size: 2rem;
      color: #6A6D71;
    }

 .operator {
      color: #fff;
      background: #283B50;
    }

    .special-operator{
      background: #F3F9FF;
    }


    .equal-sign {
      background-color:#51C9CA;
      border-color: #51C9CA;
      color: #fff;
    }
Our calculator should look like so:As you can see, our calculator buttons look is better. But the buttons are not well arranged. Let's deal with that next.
Arranging the buttons with CSS Grid
The CSS Grid Layout Module offers a grid-based layout system, with rows and columns, making it easier to design web pages without having to use floats and positioning. An HTML element turns to a grid container when its display property is set to grid.In our own case, we need to set the display property of our .button-section to grid.
.button-section{
height: 70%;
display: grid;

}
By adding that property the calculator should now look like so:
The .button-section div has become grid container and the buttons are now grid items. However, we want our calculator keys to be in four columns and not stacked on each other like we currently have.
Defining Columns and Rows
To define rows and column for a grid container we need to use the grid-template (rows or columns) in our own case we want four columns. Add the grid-template-columns property to the .button-section div like so:.button-section{
height: 70%;
display: grid;
grid-template-columns: repeat(4, 1fr);
}
Here, we’ve created four columns with each one taking 1 part of the available space. So each column will have the same width regardless of the size of the grid container. With that added our app should now look like so:
The app is almost done, but we still have a problem, if you look at the last row you notice that we have only three buttons instead of four like the other rows. We need to make sure that the zero button takes two columns in other to fill the empty column at the bottom of the calculator. Let us do that next. Add the style below to the home.page.scss file like so:
.button-section{
 .zero-button {
      grid-column-start: 1;
      grid-column-end: 3;
    }

}
Full home.page.html page code
.button-section{
 .zero-button {
      grid-column-start: 1;
      grid-column-end: 3;
    }

}
.button-section{


}
The app should now look like so.In this article, I have shown you how easy it creating a layout with CSS Grid.
Thanks for reading!.


Do you have a demo for this implementation?
ReplyDelete